


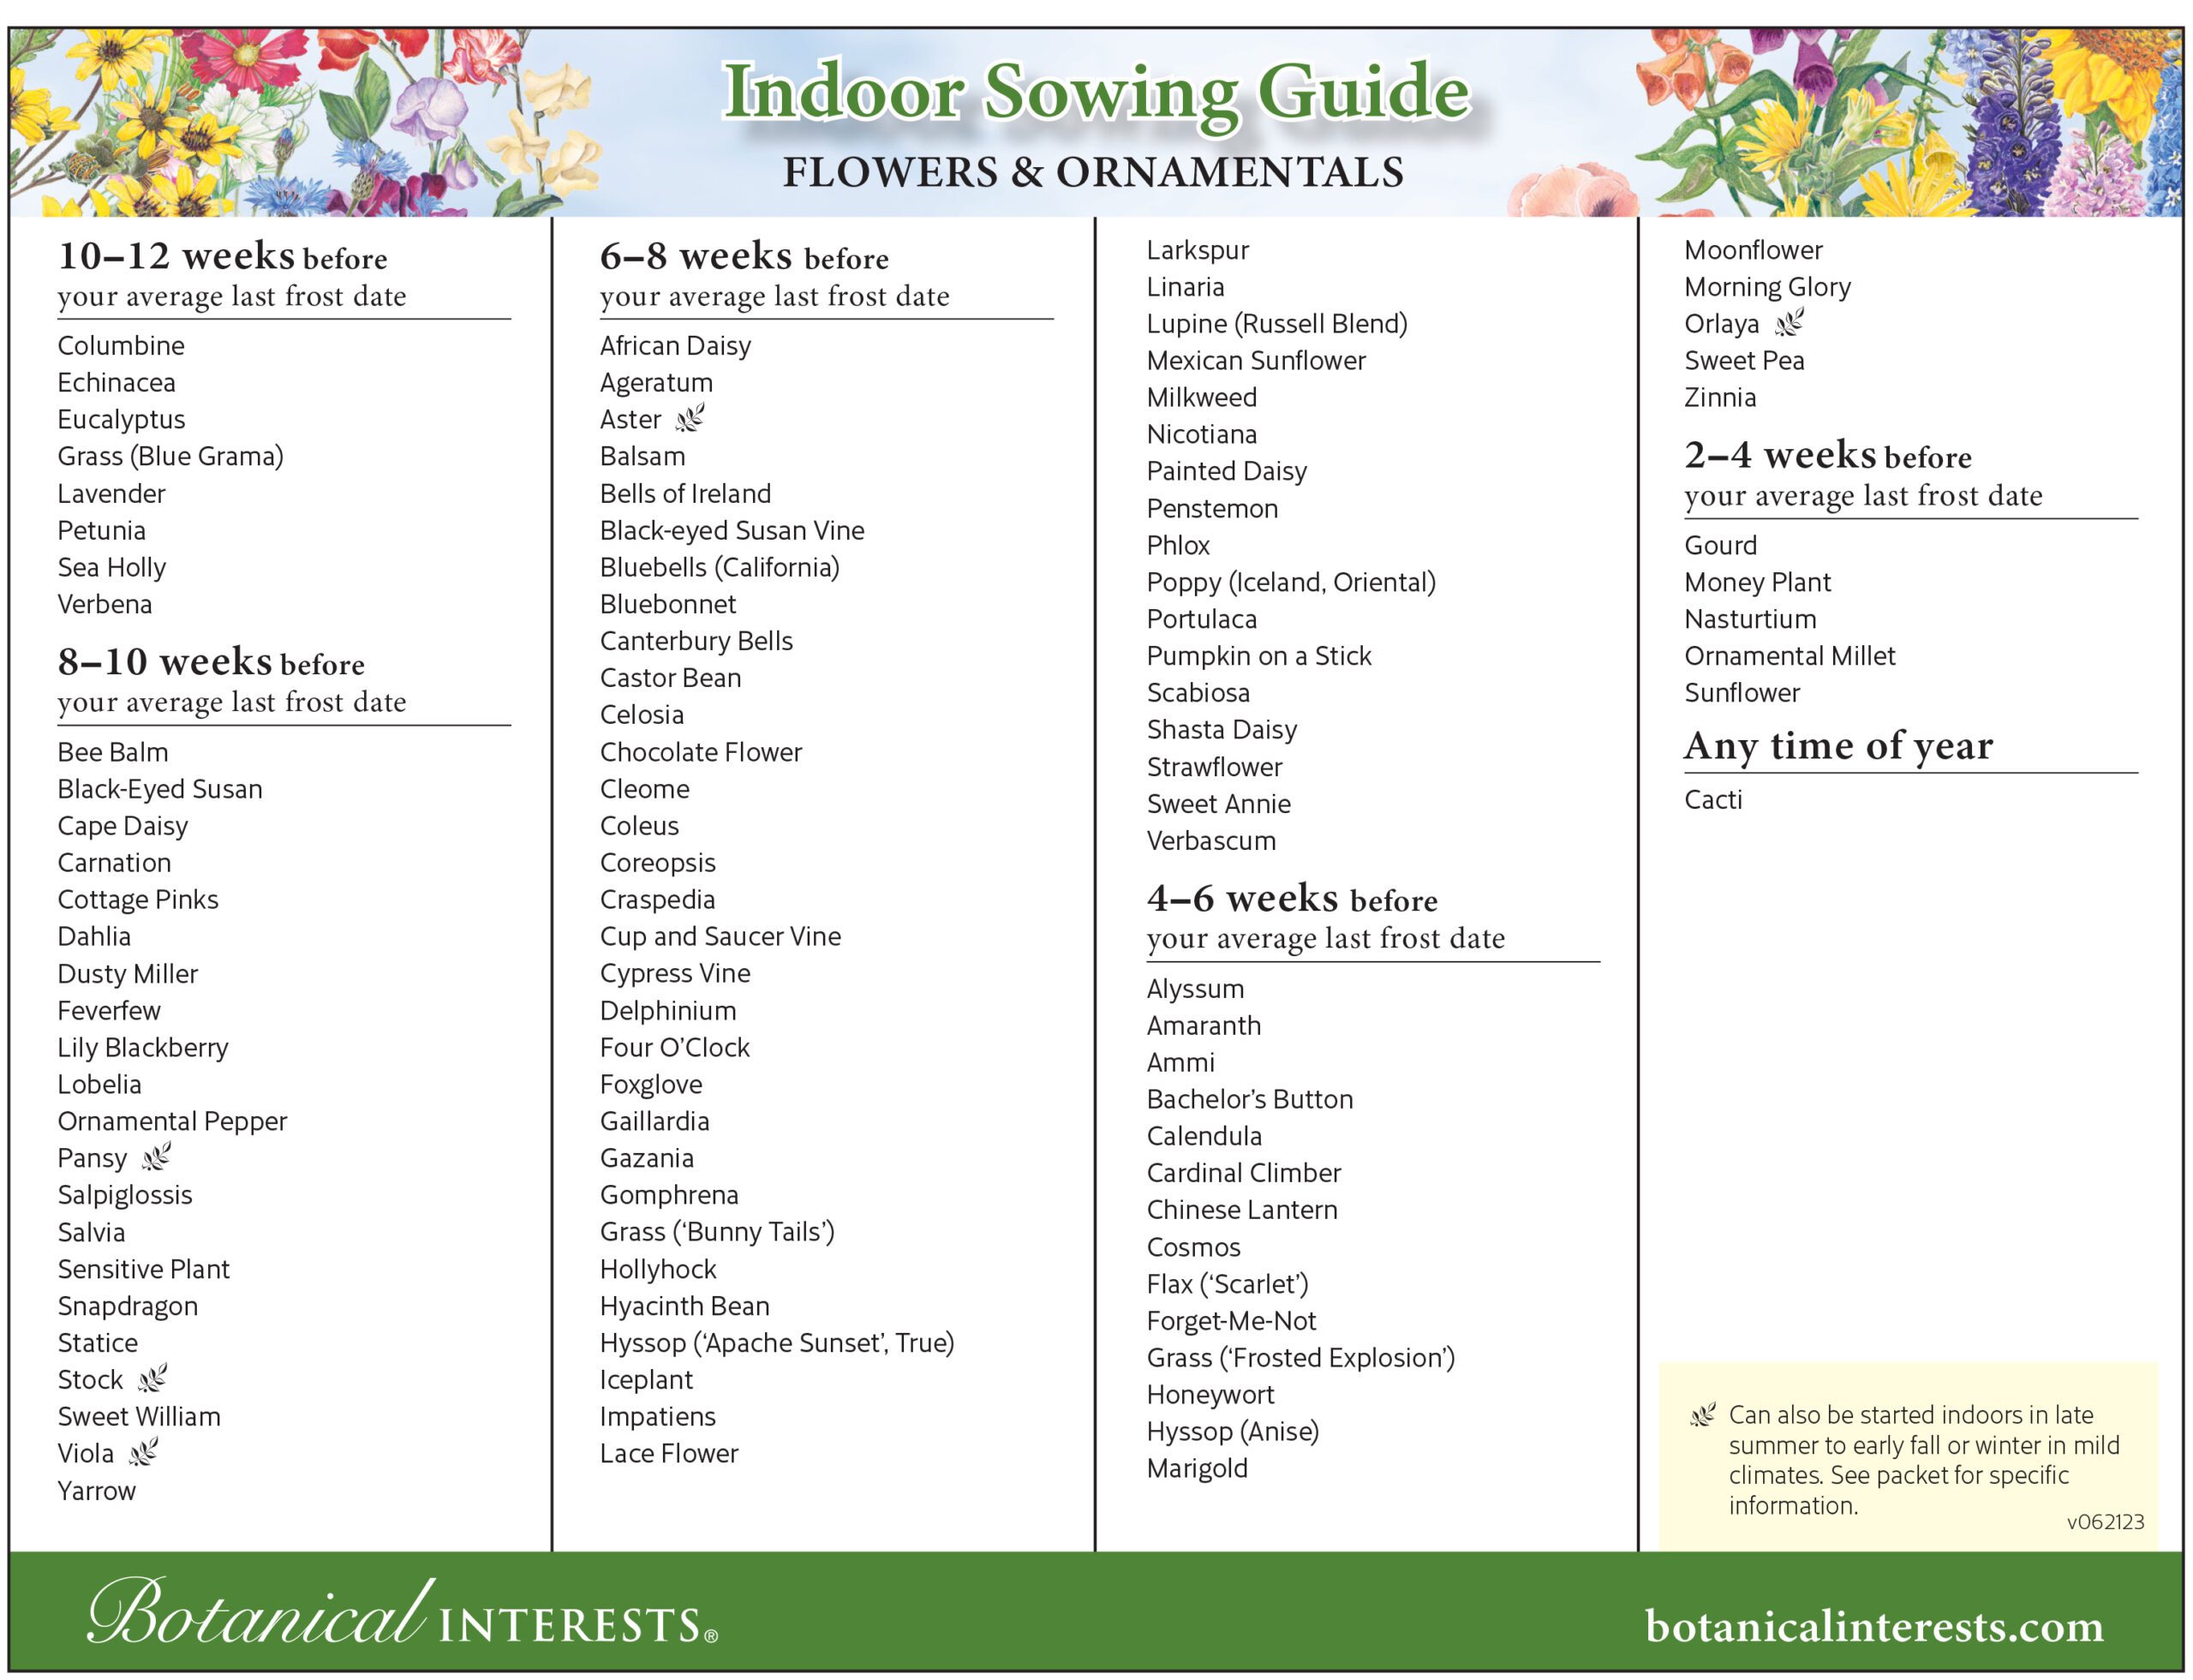
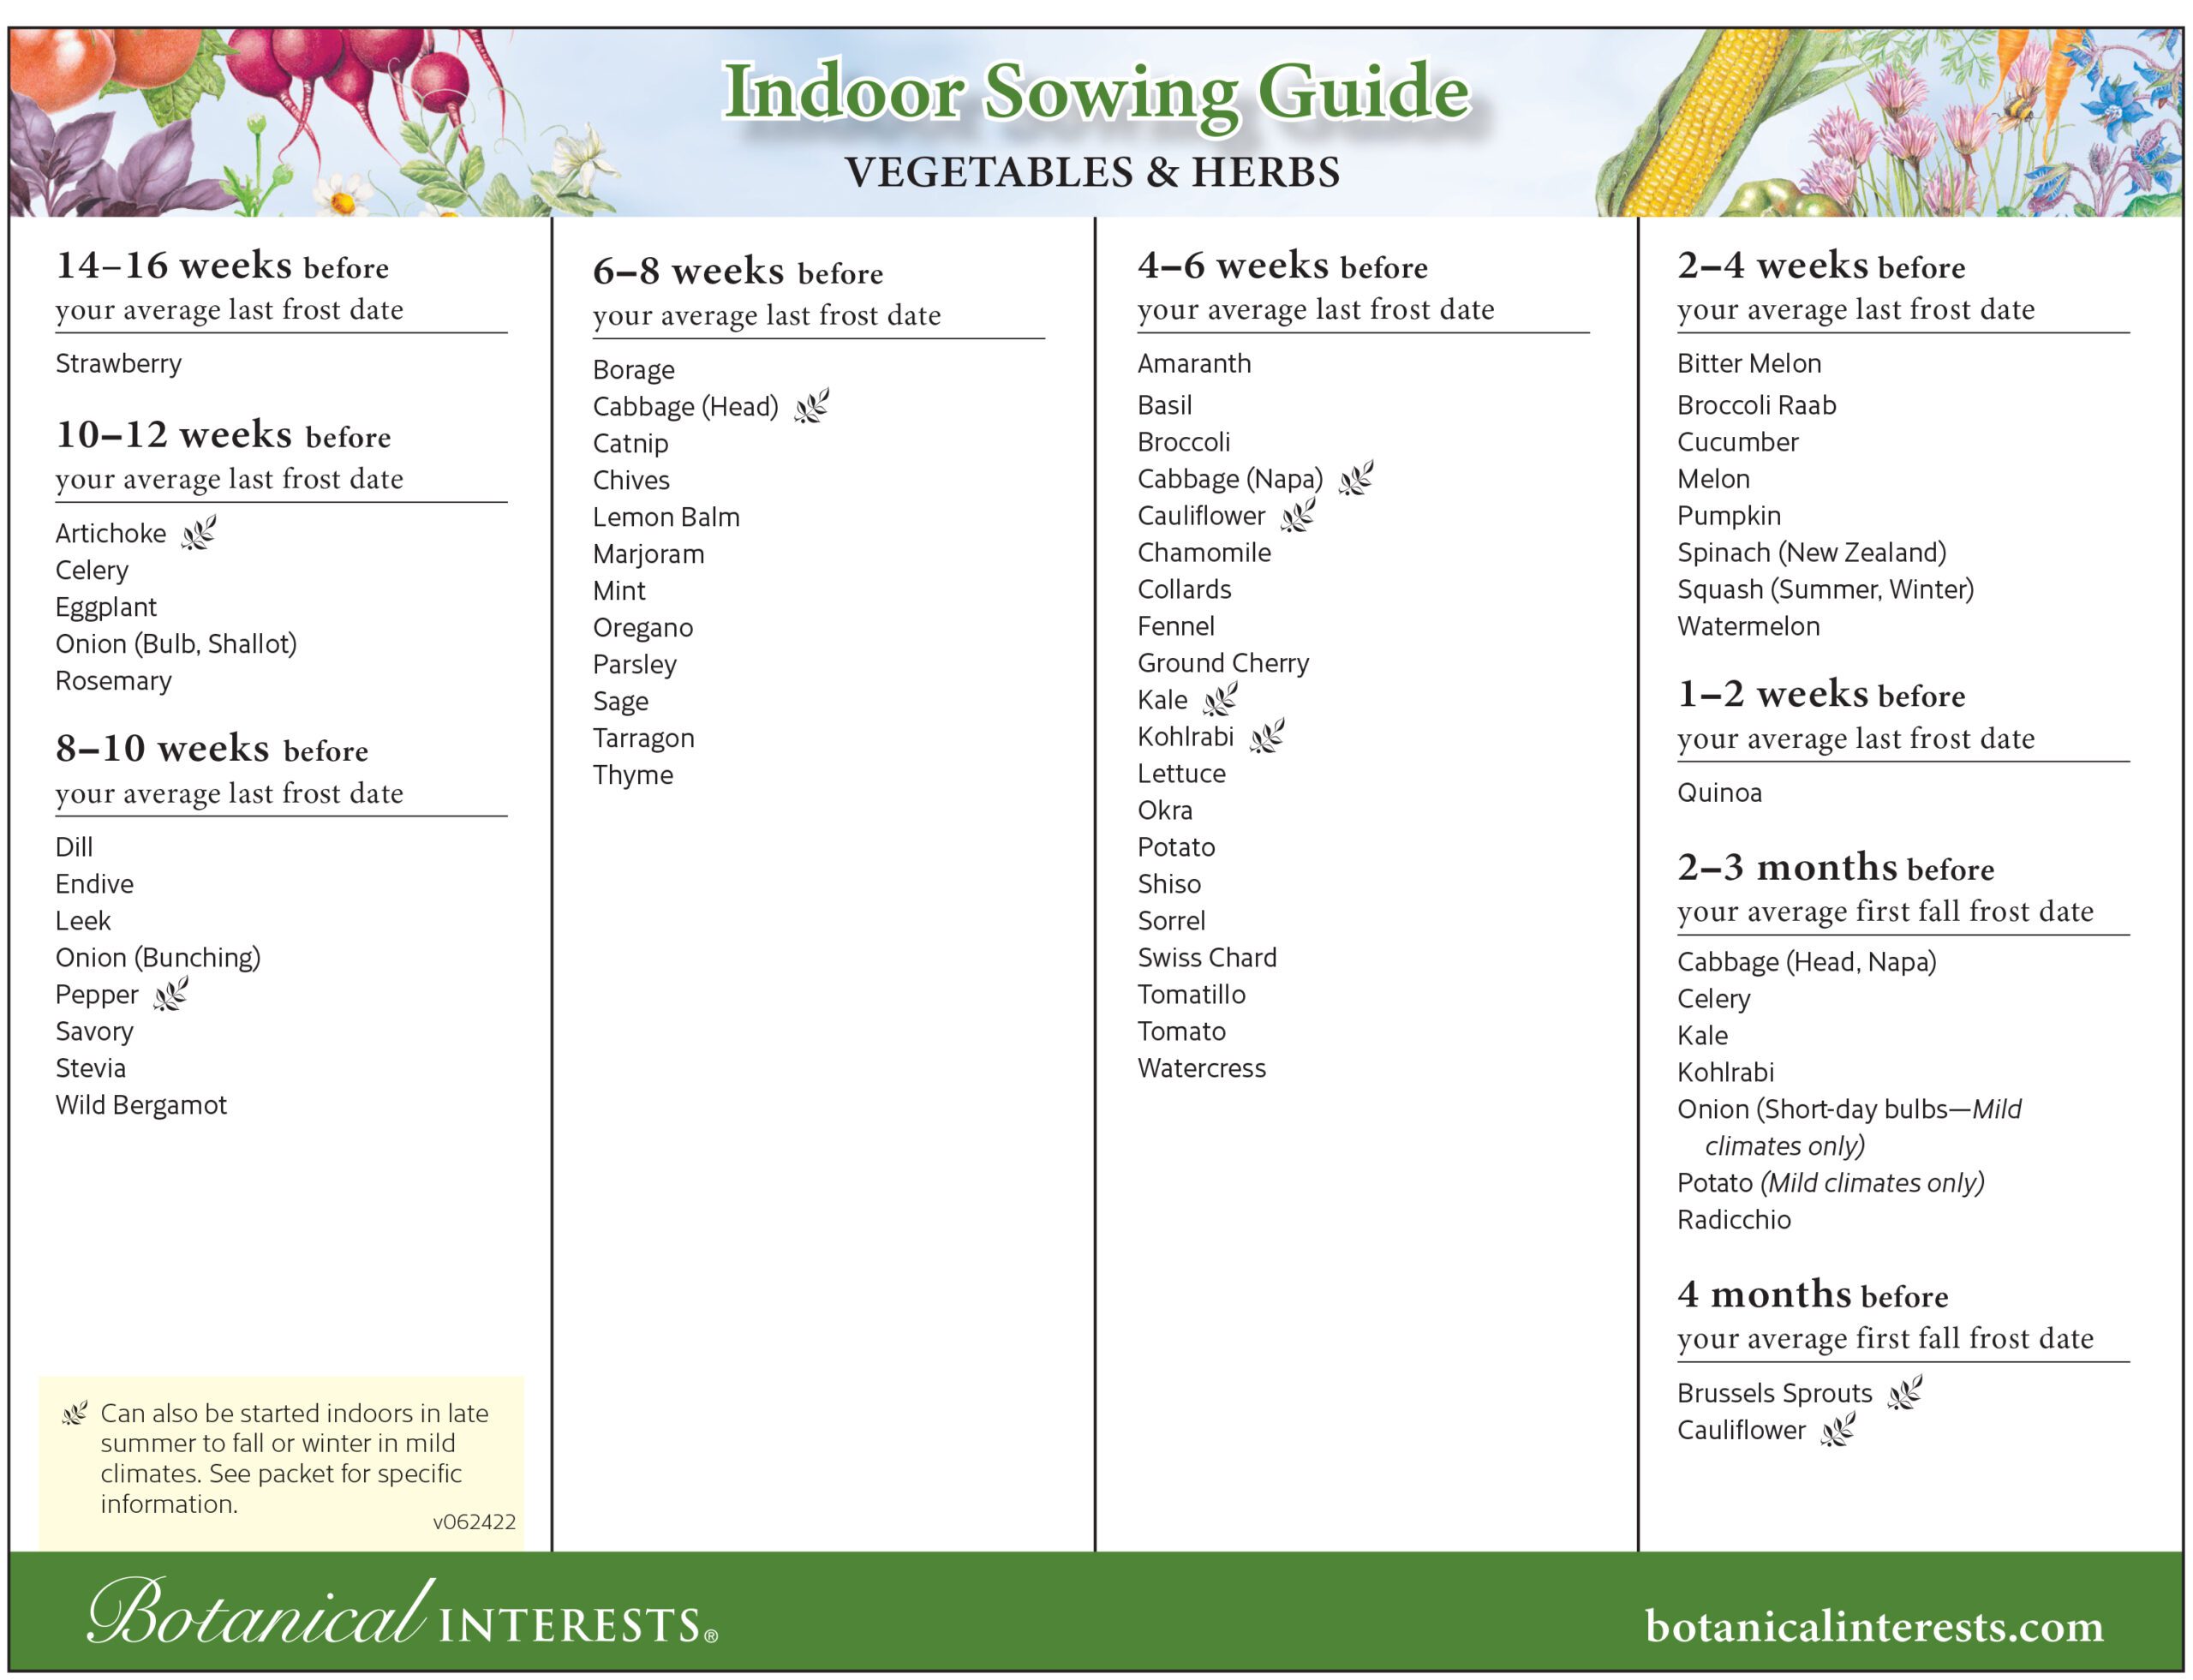
Carefully tending to your plants from the beginning invokes a sense of wonder in gardeners of all ages. This is especially true in New England, as our growing season is short. Other than cool-season crops, you’ll want to wait until after the “Average Last Frost Date” to sow outside. The Farmer’s Almanac lists that as May 4th in Boston, but this is just an average, and it varies by town. Starting from seed allows you to get a jump-start on varieties that you may otherwise have to wait until May to find in the garden center. Different seed varieties require different numbers of days to sprout and grow. All Botanical Interests seed packets are labeled with their germination time. Use this information to help you find the perfect time to sow, relative to the last frost. Here are helpful indoor sowing guides to determine when it’s best to start! Missed the window? Not to worry, go ahead and give it a go, you might just have to wait a little bit longer for the fruits of your labor.
The other advantage of starting from seed is finding a selection that you may not otherwise find in started plants. Depending on which Mahoney’s you visit, you’ll find up to 500 seed varieties to choose from – this is especially exciting if you are looking for heirloom and hard-to-find vegetable varieties!
Perhaps the most compelling reason is that seed starting provides a wonderful sense of accomplishment – especially for kids. It connects you to nature, and makes you appreciate, and control where your food really comes from. We say it’s hard to explain – you just have to experience it!
getting started
We should mention that many plants should be started from seed outdoors. Radishes, spinaches and carrots, for example, grow so fast that it is much easier to sow directly outdoors. There are other veggies such as salad greens that are fussy about being transplanted so planting directly into the garden produces better results. Microgreens and sprouts have such a quick germination time, that many prefer to grow them in a windowsill garden as you’ll be ready to harvest in 7-14 days! That said, let’s dig into seed starting indoor:
choose your container
Most people buy our seed-starting flats because they maximize plants per square inch, but no one says you have to go that route; you can use anything from cut-down milk cartons to elegant glazed pottery. As long as the container is not too shallow, and you have proper drainage, the plants don’t really care. Go with what you like to look at. We carry many biodegradable fiber pots and seed trays, perfect for growing! Note: If you do reuse a container, make sure to clean and sanitize first.
lighten up
Seeds need light – lots of it! When starting your seeds indoors, place in a south-facing sunny window. If you don’t think you’ll have enough sun, stop in and talk to us for tips on artificial lighting! There are ways to use your own lighting at home to help your seedlings along!
planting mixes
If you search online you’ll find a lot of conflicting information about what’s the “best” planting soil to use. We sell several – from our organic professional potting mix to an organic seed starting media by Espoma. They’ll all work great – just remember that regular outdoor garden soil is definitely not OK. Seeds need the right amount of moisture, warmth and air to germinate. Regular garden soil is too dense and will drown the seeds and eliminate much-needed oxygen and create an environment ripe for pests and disease.
name your plants
When they’re very young a lot of seedlings look pretty much the same, so do yourself a favor and label the plants as soon as you get started. While you are at it, mark down when you first planted the seeds. Trust us, you’ll find this really helpful.
keep it cozy
Seeds need warmth – most will germinate at temperatures around 75ºF, but eggplants, peppers, and other warm-season plants like it even warmer. Again it’s good to read package instructions carefully. Once the seeds germinate, room temperatures of 70º–75º will keep most seedlings happy.
a word about water
Water the containers as needed to keep them evenly moist but not sopping wet. Misting using a spray bottle, or bottom watering (adding water to the drainage tray) are great ways to keep planting mix moist without disturbing seeds and young seedlings. Covering your containers with a clear lid or clear plastic wrap also helps increase humidity during germination. After your seedlings emerge, remove the cover.
count down
Once your seedlings have grown enough to transplant to their ultimate spot (either in the ground or in a container) it’s time to prepare your babies to withstand outdoor conditions. It called “Hardening off.” Start by placing your seedlings outdoors in a protected, shady area. Over the next 7 to 10 days, move them more and more into direct sun (for sun-loving varieties). But remember your seedling are still very “tender” – be sure to bring them in at night if temperatures drop below 45°F. Then congratulations – you’re ready to plant.
Pollinators
Bees, hummingbirds and butterflies pollinate a third or more of the food we eat. You can help simply by choosing seeds that create habitats that protect and feed pollinators. And while you’re thinking of this, plant a diversity of colors, bloom times, and heights – it will provide a better environment, and it will be prettier for you, too.
a final thought
Before you start, take a minute to appreciate the seed. They come in all sizes – some as fine as powder – but each is a remarkable living thing with a protective outer coat, an embryo, stored nutrients, and a genetic blueprint for its development. When you stop to think, it’s really quite miraculous that a tiny seed will grow into a big, beautiful plant, in just one season!